Difference between revisions of "Enterprise Authentication using FreeRADIUS"
| Line 52: | Line 52: | ||
If you get an error saying that the port is already bound or in use then: | If you get an error saying that the port is already bound or in use then: | ||
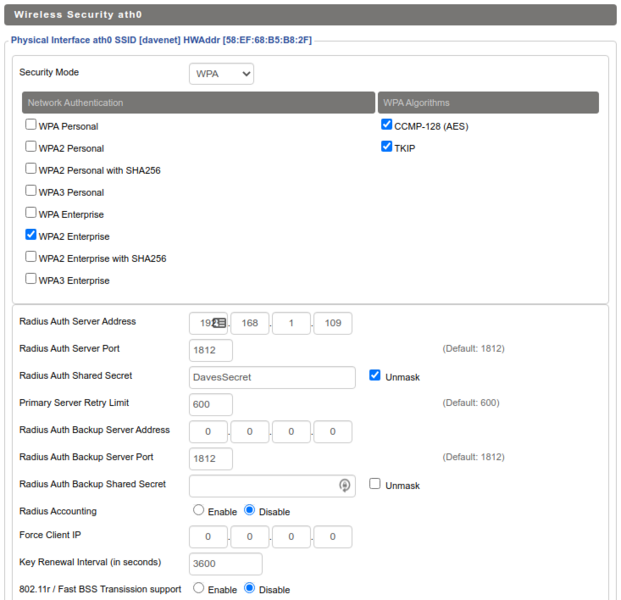
| − | + | [[File:APdot1x.png|right|thumb|x600px|alt=The configuration on your AP will look something like this. Remember to point your AP at your RADIUS server and to match up those keys|The configuration on your AP will look something like this. Remember to point your AP at your RADIUS server and to match up those keys]] | |
ps -e | grep radius | ps -e | grep radius | ||
| Line 64: | Line 64: | ||
==AP Configuration== | ==AP Configuration== | ||
| − | |||
Configure your AP with a unique SSID. Then under Wireless->Security, you should Specify WPA2 Enterprise. Enter the IP of the radius server. Use the key that you specified in clients.conf | Configure your AP with a unique SSID. Then under Wireless->Security, you should Specify WPA2 Enterprise. Enter the IP of the radius server. Use the key that you specified in clients.conf | ||
Revision as of 05:16, 7 September 2021
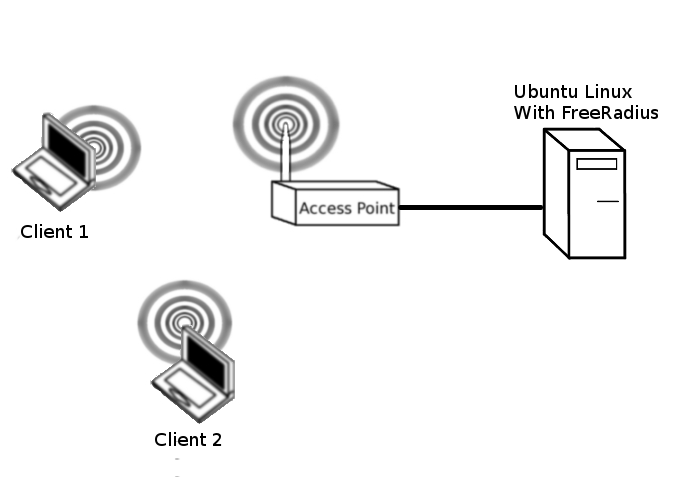
In this lab, we will configure 802.1X authentication between for the wireless clients and the AP. We will use the Ubuntu OS and the FreeRadius server. Many ISPs use FreeRadius to authenticate broadband customers. Many Enterprises also use FreeRadius for authenticating wired and wireless devices connecting to the LAN. Eduroam is based on a hierarchy of RADIUS servers.
Contents
Restore Factory defaults
At the beginning of every lab, you should restore factory defaults to remove the previous group's settings. To do this, Administration->Factory Defaults->Yes, apply, ok.
To complete this lab you will need one Ubuntu Linux PC, which will act as the wired FreeRadius server. We will also need at least two client machines, I would use one Ubuntu Linux client and one Windows client. You may also wish to attempt to authenticate using your phone or tablet.
RADIUS Installation and Configuration
Open a terminal window Applications->Accessories->Terminal
sudo apt update
Install FreeRadius on Ubuntu
In a terminal window, type:
sudo apt install freeradius (to install freeradius)
Add a RADIUS client
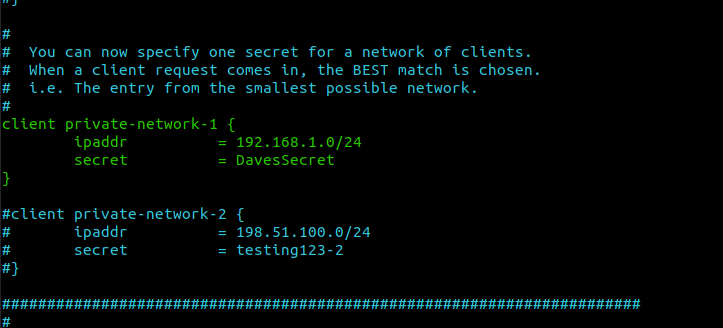
The radius client is the AP. You will need to specify the IP address and the secret key
To do this, type:
sudo nano /etc/freeradius/3.0/clients.conf
Have a good long look at the configuration file and edit it yourself. You will have to use your initiative here.
Add RADIUS users
Have a good look at /etc/freeradius/users
To do this, type:
sudo nano /etc/freeradius/3.0/users
Add a few users. Once again, you will have to use your initiative here, I tend to use the 'bob' example found further down the file. After editing these files, stop freeradius
sudo service freeradius stop
Check the configuration files with:
sudo freeradius -C
If all is well, start FreeRadius in debugging mode with:
sudo freeradius -X
If you get an error saying that the port is already bound or in use then:
ps -e | grep radius
Then:
sudo kill The pid of free_radius
Then re-run
sudo freeradius -X
AP Configuration
Configure your AP with a unique SSID. Then under Wireless->Security, you should Specify WPA2 Enterprise. Enter the IP of the radius server. Use the key that you specified in clients.conf
Client Configuration
The clients are your corporate desktops, tablets, laptops and phones. Configuration should be autodetected by the operating system but you will need to authenticate Windows, iOS, Android, OSX and Linux in many modern work environments.
The specifics, for our configuration, should be:
- Authentication: Tunneled TLS
- Certificate: Not required
- Key Exchange: MSCHAPv2
Verify your configuration by connecting a few different users. Have a look at the free radius debugging output with correct and incorrect passwords
Challenge
Refer back to your WPA_Cracking. Compare the complexity of this with a guide to cracking WPA Enterprise. What is the difference?
https://null-byte.wonderhowto.com/how-to/hack-wpa-wpa2-enterprise-part-1-0165303/
Questions
- What port(s) does radius use?
- What is the advantage of using free radius for authentication as opposed to pre-shared keys?
- What are rogue APs and how does the 802.1X architecture stop them from being used?


