Difference between revisions of "GPON PPPoE"
| Line 150: | Line 150: | ||
Then use the following firewall. You will need to change the ''x'' to the IP address of your Linux webserver. | Then use the following firewall. You will need to change the ''x'' to the IP address of your Linux webserver. | ||
| − | /ip firewall nat add chain=dstnat in-interface=pppoe-out1 dst-port=80 action=dst-nat protocol=tcp to-address=192.168.88.''x'' to-port=80 | + | /ip firewall nat add chain=dstnat in-interface=pppoe-out1 dst-port=80 action=dst-nat protocol=tcp to-address=192.168.88.'''x''' to-port=80 |
If you make a mistake, you can print the current NAT rules with | If you make a mistake, you can print the current NAT rules with | ||
Revision as of 23:59, 6 October 2022
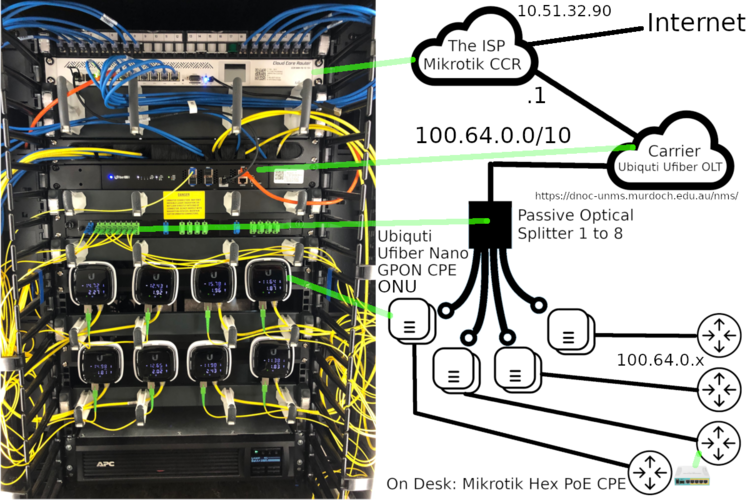
This lab should be completed in groups of two. With your lab partner, carefully review the description below and the associated diagram. Please also go into the data centre to look at the physical setup to ensure you understand the topology.
- The MikroTik hEX PoE on your desk is the customer provided broadband router.
- The UFiber Nano is the CPE (Customer Presences Equipment) which would sit in the customers household or office.
- In GPON terms the UFiber Nano is an ONU (Optical Network Unit)
- Hundreds of meters or a few KMs of Fibre would connect this to the Passive Optical Splitter
- The OLT would sit at the suburb level and this may be a few kms away from the Passive Optical Splitter
- In GPON terms this is the OLT (Optical Line Termination)
- The Service provider, in this scenario, is the MikroTik Cloud Core Router and they are running a PPPoE server to authenticate customers.
When you look at this topology try to remember that the Passive Optical Splitter and the CPE equipment can be separated by quite large distances. Note, however, that this is a multiaccess broadband network.
What we will do today is work in groups. Each group will connect one Mikrotik to the GPON Network, the other group will connect to the Copper Network labeled 'Router' and we will do some bandwidth tests. To perform these bandwidth tests we will also need to implement a port forward on the Mikrotik router.
Contents
Basic MikroTik Configuration
This lab will work most smoothly if you start from the Ubuntu Virtual machine. It may also be simpler if you remove the NAT adapter. Go to the VMware menu bar at the top - VM > settings > remove the NAT adapter (network adapter 1). Leaving the bridged network (net adapter 2) in place. Cable from your computer to the LAN port on your hEX PoE sitting in front of you on the desk. Ensure that your computer gets an IP address in the subnet range 192.168.88.2-254. If not check your cabling and see if you can reset the configuration on your hEX PoE. You should be able to browse to and see the configuration page of your hEX PoE at 192.168.88.1. By default, the username is admin and there is no password to access the device. One thing to check is that your Computers LAN link has negotiated 1000Mb/s with the MikroTik hEX PoE. We found that a 10Mb/s half-duplex link was incorrectly negotiated when using the onboard NIC on the computer.
Before you do anything make sure you reset the configuration of your hEX PoE by clicking the Reset Configuration button at the bottom of the page
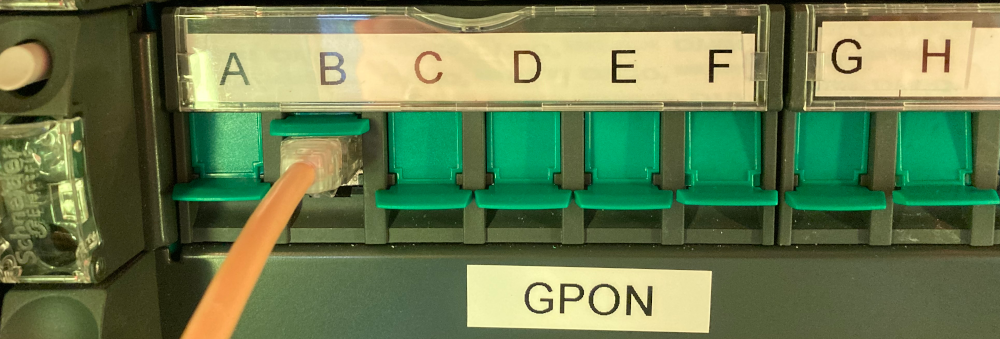
Cable from the WAN Interface on the hEX PoE through to the Data Centre. Patch this connection through to one of the ports under the GPON label. Note that individual ports are labelled: A, B, C, D, E, F, G, H. These letters match the respective ONUs marked Alpha, Beta, Charlie, Delta, Echo, Foxtrot, Golf, Hotel.
Please ensure you understand the cabling. Note that on the UFiber Nano, you should see a little green link light displayed when your MikroTik hEX PoE has been plugged in correctly. These UFiber Nanos, which are ONUs will connect to the Ubiquiti UFiber Nano, the OLT. The MicroTik CCR will authenticate the PPPoE connection which is made via the MikroTik hEX PoE. I know that this is a lot to take in.
Authenticating with the ISP
You will need to setup your MikroTik hEX PoE to authenticate using PPPoE with the ISP. The account usernames are the names of the 8 UFiber Nanos found here:
https://dnoc-unms.murdoch.edu.au/nms/
You can login with:
username: student
password: 1CCNA!2#
Have a look around as this is the Ubiquiti interface for configuring and managing the GPoN network.
| Pod # | Username | Password | Data Centre Port No | ONU Label | ONU Username | ONU Password |
|---|---|---|---|---|---|---|
| A | alpha | alpha | A | alpha | alpha | alpha |
| B | beta | beta | B | beta | beta | beta |
| C | charlie | charlie | C | charlie | charlie | charlie |
| D | delta | delta | D | delta | delta | delta |
| E | echo | echo | E | echo | echo | echo |
| F | foxtrot | foxtrot | F | foxtrot | foxtrot | foxtrot |
| G | golf | golf | G | golf | golf | golf |
| H | hotel | hotel | H | hotel | hotel | hotel |
To reiterate, each group of two students will have two Mikrotik HeX PoE routers. One router will be cabled into the GPON network, the other will have a direct copper connection to the CCS. Each will authenticate with different but matched credentials using PPPoE.
Authenticate with the ISP by using the "Quick Set" configuration page on the MikroTik hEX PoE. What IP address does the ISP provide you with? What is special about this IP Address range? If you are not sure then have a search online.
Speed tests
In this task, you will pair up with another group of two. Each group should Install a web server on their Linux based machine. You may need to temporarily unplug from the GPON network to install the websever.
sudo apt update
sudo apt install apache2
Now we are going to create a file of arbitrary size and put it in: /var/www/html/
You can create a file of a given size using:
dd if=/dev/zero of=output.dat bs=1M count=1000
Then copy it
sudo cp output.dat /var/www/html/
What is special about this directory? Why did we need sudo to copy it?
Creating a port forward rule on the MikroTik hEX PoE
In this section you are going to create a port forward from your Mikrotik to your Ubuntu Linux box. Also, ensure that you can ping the Internet-facing address of the other group's MikroTik hEX PoE. If you can't, troubleshoot before moving on. I would recommend unplugging your computer from the 134.114.148.x network to remove any ambiguity over which NIC the computer will use to send messages out. Again, make sure you can ping the other groups WAN IP address before moving on. If you have connectivity problems, make sure that the NAT checkbox is checked and you have applied the configuration on the MikroTik hEX PoE.
We are going to put a port forward on the hEX PoE sitting on your desk. All groups should do this. This port forward will take any TCP connection hitting the Internet-facing side of your hEX PoE and direct it to the IP address of your LAN based Linux PC.
SSH into the hEX PoE:
ssh admin@192.168.88.1
Then use the following firewall. You will need to change the x to the IP address of your Linux webserver.
/ip firewall nat add chain=dstnat in-interface=pppoe-out1 dst-port=80 action=dst-nat protocol=tcp to-address=192.168.88.x to-port=80
If you make a mistake, you can print the current NAT rules with
/ip firewall nat print
You can then remove a rule with:
/ip firewall nat remove numbers=[insert_number_here]
Confirm that the group you have partnered with has correctly set up their firewall rule and web server. If you open a browser and type their WAN IP address in the browser bar then you should be directed to the Apache2 Ubuntu Default Page.
Try to download the large file that they have placed in /var/www/html/
Download this file from the Linux client with:
wget http://100.64.0.x/output.dat
You can also do this in Windows. Use Firefox and browse to:
http://100.64.0.x/output.dat
Thinking about the results
Think carefully about the speeds you were expecting and how they change as other users in the lab start and stop their downloads. Remember than in GPON there is only a single fibre and users are also sharing the bandwidth based on TDMA. Furthermore, unlike fibre Ethernet where there is a separate cable for the uplink and downlink, in GPON the uplink and downlink is duplexed based on time.
Note that the GPON OLT unit specs are here: https://store.ui.com/products/ufiber-4-olt
It can transfer at rates up to 2.488 Gbps TX and 1.244 Gbps RX and can be split up to 128 times. The Australian NBN GPON splits a single OLT fibre into 32 homes. Remember that each time the signal is split, the Signal to Noise Ratio (SNR) will likely decrease. The SNR, which you can inspect by walking into the data centre and looking at the Nano ONUs (or the UNMS page), will also decrease with distance.
Troubleshooting Notes
- I have noticed weirdness where, in this network, two GPON houses cannot directly connect, which is why this lab specifies that connections occur between Devices GPON ONUs and Routers that directly connect to the ISP

