Raspberry Pi and Basic Electronics
The purpose of this lab is to introduce you to some very basic electronics and how we can integrate the Raspberry Pi. Please view this as a taster of a much larger area. The assumption is that you have already completed Install Raspbian get connected and basic networking.
Contents
Getting the packages
To get started, it is important that we have the Python packages that will allow us to manipulate the pins on the Raspberry Pi. For future-proofing, are standardizing all code on Python 3. So to complete this lab, you will need to install some packages:
sudo apt update
Then
sudo apt install python3-pip
After this:
sudo apt install python3-rpi.gpio
Turning on an LED
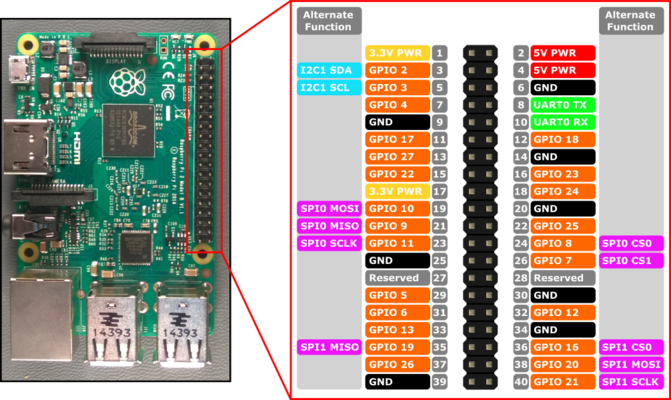
So in this first activity, I will show you how you can use Python code to turn on an LED in a Raspberry Pi. Start by watching the following video on breadboards: https://www.youtube.com/watch?v=fq6U5Y14oM4. First, we will do the wiring: carefully inspect the pinout of the Raspberry Pi below. This is the Pinout for the Raspberry Pi 3.
Pick out one of your LEDs. Note that one side is longer than then other. The longer side is positive (red) and the shorter side is negative (black).

Physical wiring
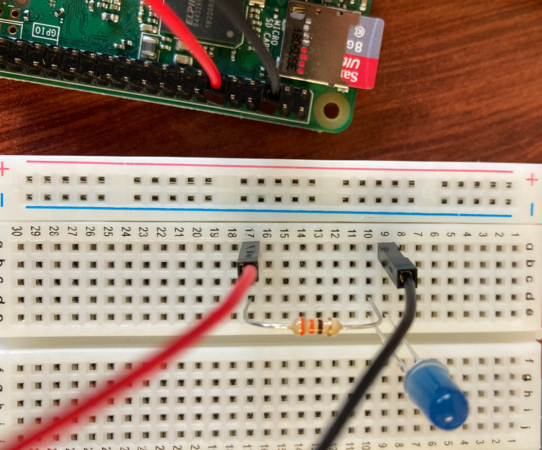
With this in mind, I want you to use a black, female to male, wire to connect from the ground Pin 6 on the Raspberry Pi, to the negative line attached to the shorter side of the LED.
Now I want you to get a resistor and run the resistor from the positive line of the LED to a separate line I then want you to connect the circuit by running a red, female to male connection between the Raspberry Pi's GPIO 18 pin to join with this resistor.
It may be better to try to copy the diagram below and then re-read the steps above for understanding.
The Python3 code
Now we will write the code to tun on the GPIO 18 Pin to switch on the light.
Open your favourite text editor on the raspberry pi:
nano led_light.py
Then insert the following code.
#!/usr/bin/python3

import RPi.GPIO as GPIO
import time

GPIO.setmode(GPIO.BCM)
GPIO.setwarnings(False)
GPIO.setup(18,GPIO.OUT)

print("LED on")
GPIO.output(18,GPIO.HIGH)
time.sleep(2)
print("LED off")
GPIO.output(18,GPIO.LOW)
Challenge
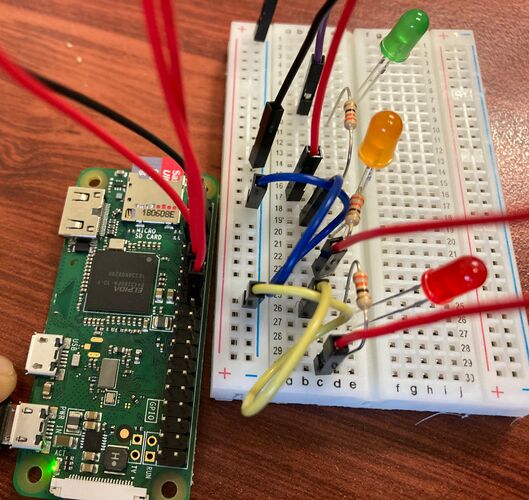
You should have a pack of LED lights and resistors. Can you write code to implement a basic traffic light system. Further task can you read about the breadboard's rails (see: https://learn.sparkfun.com/tutorials/how-to-use-a-breadboard/all) and then minimise the wiring to make this traffic light system work.
Save the code and then run it with:
python3 led_light.py
Make sure that your code loops infinitely through the traffic lights by using a while loop.
Inputs that cause outputs
In this next section, we will get use the existing lighting system but we rather than a simple traffic light, we will use lights to represent the varying temperatures of the CPU.
We would like the operation of the fan to turn on to cool the CPU on your mini computer. The following command will show you the current temperature of your CPU
/opt/vc/bin/vcgencmd measure_temp
For me this reports:
temp=32.0'C
But the value will vary. What we want to do is get this value 32 into your python code.
#!/usr/bin/python3

import RPi.GPIO as GPIO
import time
import os
import sys
import signal
import subprocess

GPIO.setmode(GPIO.BCM)
GPIO.setwarnings(False)
GPIO.setup(18,GPIO.OUT)
GPIO.setup(17,GPIO.OUT)

print("LED test")
GPIO.output(18,GPIO.HIGH)
GPIO.output(18,GPIO.HIGH)
time.sleep(1)
GPIO.output(17,GPIO.LOW)
GPIO.output(17,GPIO.LOW)
print("LED test done")

temp = os.popen('vcgencmd measure_temp').readline()
print(temp)
temp= temp.replace("temp=","").replace("'C\n","")
print(temp)

while True:
    if  float(temp) > 45:
        print("Temperature over 45C Warning LED on")
        GPIO.output(18,GPIO.HIGH)
        GPIO.output(18,GPIO.LOW)
        time.sleep(2)
    else:
        print("Temperature below 40C System Normal LED on")
        GPIO.output(17,GPIO.HIGH)
        GPIO.output(17,GPIO.LOW)
        time.sleep(2)
Run the code, in a terminal with:
python temperature_monitoring.py
Generating CPU load
We want to generate load on the CPU; paste the following code into a new text file.
n = 100000
p = 2

for p in range(2, n+1):
    for i in range(2, p):
        if p % i == 0:
            break
    else:
        print p,
print 'Done'
Same as before save it. You can call this primes.py as it will calculate all the prime numbers between 2 and 100,000. As before ensure it has execute permissions then run it with:
python primes.py
You should run it in a separate window. To do this you could use tmux or a second ssh session. You should be able to watch the temperature of the CPU increasing. You can stop the program with Ctrl+c, and the temperature should drop.
Challenge
Modify the code and the wiring so that there are three levels and three different colors that will be displayed, so work out the code and the circuit for low, medium and high temperatures.
Using the Fan
Trying to power through GPIO
Lets start by plugging your fan straight into your Raspberry Pi, Joining the black wire to the ground (pin 9) shown in diagram Xyz and the red wire to GPIO 17 as shown in the same diagram. Refer te the picture of my cabling as well.
Then, use the code below to try to run the fan.
 #!/usr/bin/python3

 import RPi.GPIO as GPIO
 import time
 GPIO.setmode(GPIO.BCM)
 GPIO.setwarnings(False)
 GPIO.setup(17,GPIO.OUT)
 print "Fan on"
 GPIO.output(17,GPIO.HIGH)
 time.sleep(1)
 print "Fan off"
 GPIO.output(17,GPIO.LOW)
This should not work. Why? Because the maximum power draw from a GPIO pin is 16 mA.
Trying to power through the 5v
We can, however, power straight through the 5V Pin. Plug your fan straight into the 5V and Gnd as shown in Xyz and the picture
So lets say that we wanted to use the Raspberry Pi to power something much more energy intensive.


