Install Raspbian get connected and basic networking
In this activity, we will show you how you can get started with your Raspberry Pi. Some of you may have done this before and there are easier ways to do this. The most simple way to get started with a Raspberry Pi is to buy a pre-installed sd card running NOOBS. You can then plug in a monitor, keyboard and mouse.
The aim of this unit is to teach you some fundamentals of IoT device, so it is important that you can use a serial connection on an IoT device which may not have an Internet connection. Secondly, we have devised an IoT and a unit with no additional assumptions above a laptop and a phone. So we are assuming that you don't have a spare keyboard, monitor and mouse available.
Contents
Downloading and Flashing Raspbian on an SD Card
Start by downloading the Raspbian Lite image: https://www.raspberrypi.org/downloads/raspbian/
The reason that we will use the Raspbian lite image is that it does not use a graphical user interface. We will do our best to keep students on the command line as this is how most IoT devices will run, in "headless mode".
While the image is downloading, please find, Download and install Balener Etcher from:
We will use Balener Etcher to safely install the image to your sd card. It works on Windows, OSX and Linux and does a pretty good job of preventing you from writing the Raspbian image to any of your computer's drives.
Insert your SD Card, into your USB-SDcard reader. Then insert the USB-SDcard reader into your computer.
Open the BalenerEtcher software on your computer. Pick "Flash from file" and then find your downloaded Raspbian image name it usually start with a date like "2020-06-13-raspbian...."
Finally, you must select your drive, note the capacity of your purchased MicroSD card and ensure that you are flashing a device with the same capacity. Note that the number on the box will slightly overestimate the actual capacity. I purchased a 16GB MicroSD card and Balener Etcher reports it as a 15.5GB MicroSD card. After this, click flash and enter your password if required.
Enabling the TTL/Serial Lines
At this point, we have our SD card flash. If we wanted we could plug in a keyboard and monitor, but we are going to assume you don't have these and enable the serial lines. Serial connections have been used for over 20 years to connect to Internet Routers, Switches and all types of hardware. It is very important that you get familiar with how this works.
By default, the TTL/Serial lines are off, we are going to switch them on. Eject and then replug your USB-SDcard reader back into your computer. Find the partition called boot. Within here, find the file called config.txt Edit this file and at the bottom, on the last line, add
enable_uart=1
Save the file and exit.
USB to TTL/Serial
You should now remove the MicroSD card and put it in your raspberry pi.
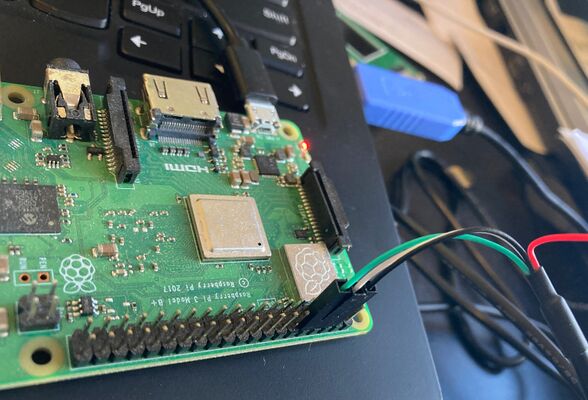
Plug in the USB to TTL cable into your laptop. Wire the other end as shown in the diagram.
Do not connect the red wire as this will attempt to power, but may undersupply your raspberry pi. We will provide a regular power source to power your raspberry pi. See the diagrams to your right for the correct physical wiring.
In the next step, we will read and write the serial text from your USB cable. How you do this will depend on your operating system.
Windows
Install putty from:
http://www.putty.org/
You will also need the drivers Prolific Chipset drivers from here:
http://www.prolific.com.tw/US/ShowProduct.aspx?p_id=225&pcid=41
Start Putty by clicking on the .exe then select a connection type "Serial" from the radio buttons. Set the speed to 115200 and the serial line to COM7. Finally, click 'Open' to connect. Remember to press ENTER to start communications.
Mac
On a Mac open a Terminal window and issue the command:
ls /dev/cu.*
Linux
In Linux, you can use the screen application. You can install it in Ubuntu with:
sudo apt-get install screen
Then run the following command:
sudo screen /dev/ttyUSB0 115200
Logging into the Pi
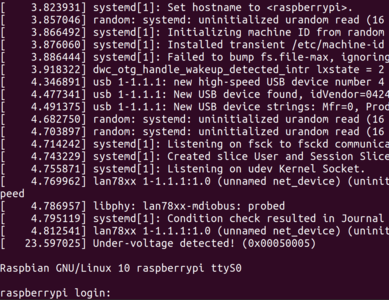
Using your serial connection you should now see output similar to what is shown in the image to the right.
The default login for your Pi is:
Username: pi
password: raspberry
Once you have logged in you should immediately set a strong password with:
passwd
Connect to a WiFi network
To connect via the cli, open wpa-supplicant.conf:
sudo nano /etc/wpa_supplicant/wpa_supplicant.conf
Go to the bottom of the file and add the following:
Note: your password will be echoed onto the screen so just ensure that nobody is looking over your shoulder. You can go somewhere private or you can also drag your terminal window off the screen and still type. Remember Ctrl+x then y to save and exit.
network={
    ssid="thisismyssid"
    psk="thisismypassword"
}
Reboot your machine with:
sudo reboot now
Log back in and check what the IP address of the machine is.
Update your Pi via apt
You can
sudo apt update
Then:
sudo apt upgrade
To update your pi.
Turn on SSH
You can turn on the ssh server so that you can access the pi from your Linux virtual machine with:
sudo apt install openssh-server
Afte this type
sudo raspi-config
Then go to
InterfacingOptions->SSH
And enable ssh. Test that ssh works by opening an ssh client on your Linux VM, ssh to the IP address of the raspberry pi in a separate terminal.
ssh pi@[IP address]
Challenge SSH keys
Can you get SSH Keys working on the Raspberry Pi? Can you SSH from your Linux Virtual machine into your raspberry pi without any passwords?
https://csn.murdoch.edu.au/mediawiki/index.php/Linux_Essentials_for_the_IoT#Challenge:_SSH_Keys

