IoT Coding basics
In this activity, we are going to teach you to integrate some Python and bash. We can't completely teach you how to code from the ground up in on or two topics but I hope that this is a sufficient starting point. The most important thing is that you invest some time coding some projects that you are emotionally invested in. In my experience, most people don't love coding for the sake of coding, but many people love the challenge of trying to code a solution to a problem they have. Ultimately in this activity, I just want to get you started chopping and hacking bits of code together. Combine this with some good Google-Fu, and a language like Python and you can have some great results in a short period of time.
If you want a decent succinct overview of different coding languages see here and here. Personally, I always loved coding in Ruby, but it lacks the library support of Python, which is what enables you to write complex code very quickly. I also enjoyed coding in C, but again, Python makes is so much faster for the programmers to reach their destination.
Contents
Hello World!
In this section, we will run Bash and Python hello world examples.
Bash
#!/bin/bash
# This is a bash comment
echo "Hello Bash World!"
Python
#!/usr/bin/env python3
# This is a python comment
print("Hello Python World!")
Use your favourite text editor to create these two files hello_world.sh and hello_world.py. Make sure you provide them with execute permissions
chmod 777 hello_world.sh
And
chmod 777 hello_world.py
You can execute them with
./hello_world.sh
And
./hello_world.py
The contents of the code should be prety straightforward. The only link that may need explaining is the shebang first line. The shebang line allows the script to executed like a standalone executable without typing python, ruby, et cetera. It also immediately tells someone looking at the code, what language has been used and in the case of python it can specify the version of python that is used to execute it.
Variables
Modify your current code using the following code snippets
Bash
a="Hello bash using variables"
echo $a
Python
a="Hello Python using variables"
print(a)
Make sure you understand everything before moving on.
Basic calculations
Lets add some calculations to our previous code:
Bash
a=10
b=5
c=$((a+b))
echo $c
Python
a=20
b=10
c=a+b
print(c)
Run them both. Once you understand, I would like you to modify the examples so that you are familiar with subtraction, multiplication and division.
Modify the Code 1
Examine the following two code snippets written in Bash and Python.
Bash
#!/bin/bash
for ((i=0;i<10;i++));
do
  echo $i
done
Python
#!/usr/bin/env python3
for x in range(10):
    print(x)
Modify each code snippet to print the square of each number in the sequence. So the output should look like:
0
1
4
9
16
25
36
49
64
81
Can you create an average of the numbers in the sequence? So the output should just be:
4.5 for python
4 for bash as it does not natively support decimal or floating-point numbers
Hacking together Bash and Python
Some times there are really great function or programs that you wish to run and get the output in your python code. So the code that you run within python could be anything C, Ruby, Bash, whatever we could normally run on the command line, we can run within Python (or bash but we will use Python example).
Lets start with a simple example. Type
date
on your Linux command line. Ok now lets work on getting this within our Python code. Look at the python example below.
#!/usr/bin/env python3
import subprocess

print("Hello Python World!")
subprocess.call("date")
Rune the code above and make sure it works. Sometimes we might want to get date into a variable:
#!/usr/bin/env python3

import subprocess

print("Hello Python World!")

result = subprocess.run(['date'], stdout=subprocess.PIPE)
print(result.stdout.decode('utf-8'))

theresult=result.stdout.decode('utf-8')

print("This is the result of date: " + theresult)
Upgrade the Python2 code
The following is a Simple python game, that reuses the random function from bash that we used earlier. The problem is that it was coded for Python 2. I want you to upgrade it so that it will work natively with Python 3. You will need to edit the shebang as well as the print statements
#!/usr/bin/python2

from random import randrange

theanswer=randrange(8)

print "Seeking answers from the computerized 8 ball"
if theanswer == 1:
  print "Perhaps"

elif theanswer == 2:
  print "Outlook good"

elif theanswer == 3:
  print "Don't count on it"

elif theanswer == 4:
  print "Hmmmmm"

elif theanswer == 5:
  print "Focus and it will happen"

elif theanswer == 6:
   print "It seems unclear"

elif theanswer == 7:
   print "It is a certainty"

elif theanswer == 8:
   print "Unlikely"
Note that the code above will work, but once you change the shebang to indicate python3 then you will need to make it Python 3 compliant.
Virtual Terminals
Tmux is a virtual terminal. An alternative is screen, but my personal preference is tmux. You can install it with:
sudo apt install tmux
If you are on an apple system you can:
brew install tmux
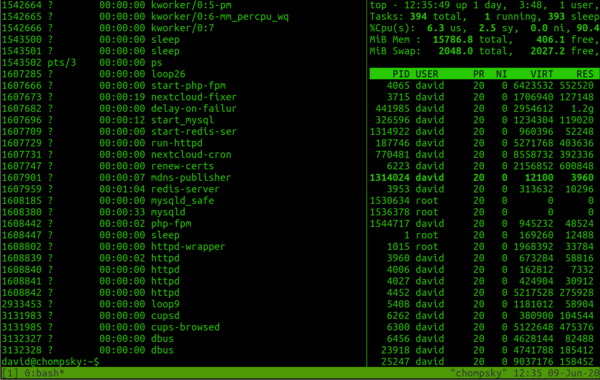
Tmux is great! Unfortunately, it makes the vim and emacs text editors look user friendly. Start a tmux session with:
tmux
Start top in your tmux session and leave it running. We are going to ungracefully exit. Using tmux, whether your ssh session is broken, you close your terminal. The session will keep running in the background.
After you have closed down all your terminal sessions, get a new one and reattached with:
tmux attach -t 0
This time you can detach gracefully with ctrl+b then d. Unless, like me, you mis-spent your youth playing computer games on keyboards, then this may take some practice to feel natural.
Please invest some time with tmux. See if you can split the screen. There is a more in-depth guide here
If you really don't like tmux then you can always try 'screen', which is installed by default.

