Using the Raspberry Pi to Switch Power
In the future, even small everyday objects will be Internet connected and will interact with each other in a variety of ways. With a greater understanding of environmental effects, buildings will adjust heating, cooling, fans, lighting, windows to save power. Reticulation may operate based on soil moisture levels, and cars may self-report potholes and report maintenance work to the service centre. In our introduction to the Internet of Things, we will use a Raspberry Pi to prototype a Simple IoT system.
The purpose of this lab is to introduce you to the IoT, programming in Python and the Raspberry Pi. A Raspberry Pi is a miniature PC, and we use it in this lab to represent embedded systems inside all sorts of appliances.
Contents
Connect up your Raspberry Pi Computer
Start by plugging in your SD card, connecting the HDMI to the monitor, plugging in a USB keyboard and mouse and providing power to the unit. Boot into the computer; you should see the graphical interface of the Raspbian Operating System. Once you are satisfied that your Raspberry Pi is working, pull out the power, and we will start cabling up your fan.
Connect the fan and the MOSFET
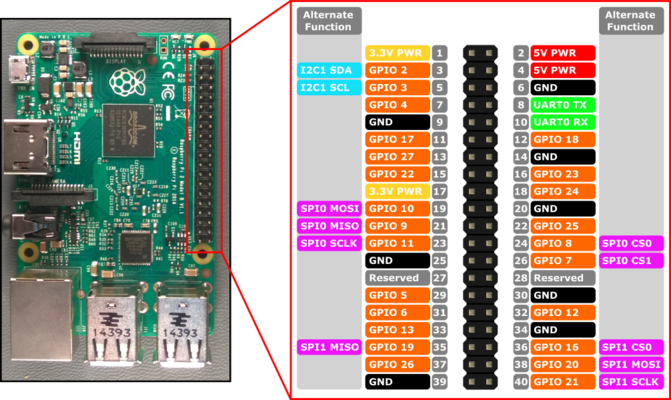
The diagram below shows the pinouts on the Raspberry Pis. These are used to provide a range of functionality. Note that the Fan is not directly wired to the Raspberry Pi. Instead, it is wired through a MOSFET (Metal Oxide Semiconductor Field Effect Transistor!).
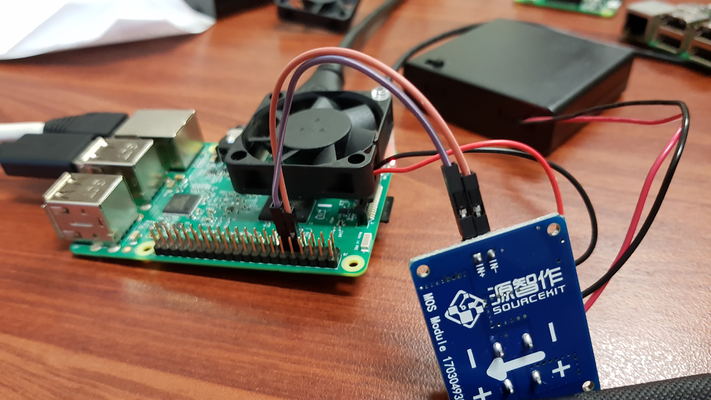
The wiring should resemble one of the diagrams below. Note that there is one output from the MOSFET to the fan and there are two inputs into the MOSFET from the Raspberry Pi. The reason is that the GPIO pins are not capable of producing the amount of current for turning the fan. A MOSFET is an electronic gate. We can use the GPIO Pin to turn the device on and off, while the power source may come from something external. If required we could turn a 240V circuit on and off in this manner.
If it is difficult to see the pins on the raspberry pi that is in use then you may refer to the diagram below.
Feel free to ask your instructor to check your cabling before moving on. Once you think your cabling is correct, you can attach the fan to the raspberry pi using the plastic standoff.
Basic code to operate the fan
Open up a text file, by clicking on the raspberry symbol in the top left, going to accessories,and slecting the text editor. Paste in or type the following code. Name the file fan.py and save it in the folder called pi.
import RPi.GPIO as GPIO
import time
GPIO.setmode(GPIO.BCM)
GPIO.setwarnings(False)
GPIO.setup(17,GPIO.OUT)
print "Fan on"
GPIO.output(17,GPIO.HIGH)
time.sleep(1)
print "Fan off"
GPIO.output(17,GPIO.LOW)
To run this program, you will need to open a terminal. Click on the black box at the top of the screen with a >_
You can then run the code in the terminal with the command:
python fan.py
If the fan does not turn, double check your cabling and ensure that the battery pack is switched on.
Can you modify this code so that the fan will turn on for 60 seconds?
Controlling the fan based on environmental conditions
We would like the operation of the fan to turn on to cool the CPU on your mini computer. The following command will show you the current temperature of your CPU
/opt/vc/bin/vcgencmd measure_temp
Read the following code and see if you can work out what is going on. Open a new file, paste the code below and save it as cooling_system.py
import RPi.GPIO as GPIO
import time
import os
import sys
import signal
import subprocess

GPIO.setmode(GPIO.BCM)
GPIO.setwarnings(False)
GPIO.setup(17,GPIO.OUT)
print "Fan test"
GPIO.output(17,GPIO.HIGH)
time.sleep(1)
print "Fan test complete switching off"
GPIO.output(17,GPIO.LOW)

temp = os.popen('vcgencmd measure_temp').readline()
print temp
temp= temp.replace("temp=","").replace("'C\n","")
print temp

while True:
    temp = os.popen('vcgencmd measure_temp').readline()
    print temp
    temp= temp.replace("temp=","").replace("'C\n","")
    print temp
    if float(temp) > 40:
        print "Temperature over 40C fan on"
        GPIO.output(17,GPIO.HIGH)
        time.sleep(2)
        print "Fan off"
        GPIO.output(17,GPIO.LOW)
    else:
        print "Temperature below 40C fan off"
        GPIO.output(17,GPIO.LOW)
        time.sleep(2)
Run the code, in a terminal with:
python cooling_system.py
Generating CPU load
We want to generate load on the CPU; paste the following code into a new text file.
n = 100000
p = 2

for p in range(2, n+1):
    for i in range(2, p):
        if p % i == 0:
            break
    else:
        print p,
print 'Done'
Same as before save it. You can call this primes.py as it will calculate all the prime numbers between 2 and 100,000. As before ensure it has execute permissions then run it with:
python primes.py
You should run it in a separate window, and you should be able to watch the temperature of the CPU increasing. You can stop the program with Ctrl+c, and the temperature should drop.


